Incredibly Useful Garden Tips That Actually Work!
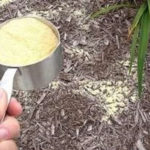
1 Cinnamon
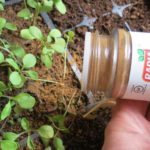
Chances are you have powdered cinnamon in your home, and if you do, you may find it much more useful than just adding a pleasant taste to some of your dishes. Indeed, it has a number of different benefits for your garden!
First of all, if your garden is prey to ants, know that cinnamon is an excellent deterrent. Sprinkle some around your garden and ants won’t be a problem anymore. Cinnamon is also a perfect rooting agent, so if you apply a small amount on the stem when you plant your cutting, their growth will be greatly optimized.
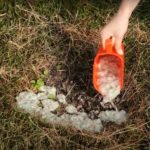
2 Epsom Salt
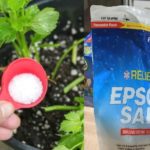
While fertilizer is an essential part of keeping your plants healthy, you might not know that Epsom salt acts as an incredibly effective fertilizer for your shrubs. Epsom salt contains magnesium, which allows your seeds to germinate and helps your plants absorb vital nutrients they need to stay alive. It’s cheap, easy-to-use, and it will keep your plants healthy and your garden filled with greenery.
Use roughly two teaspoons of Epsom salt mixed with one gallon of water per month. Pour the mixture onto the base of your plants, then sit back and watch them grow!
3 Use Newspaper
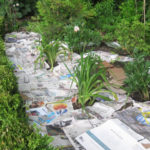
While weed killer can rid your garden of weeds after they pop up, a little newspaper might keep the weeds from ever appearing in the first place.
As you’re planting your garden, layer the soil with a few pieces of newspaper. Newspaper still allows moisture to reach the roots of your plants, but it also creates a barrier that keeps weeds from rearing their ugly heads. The weeds will be unable to establish themselves in the soil, but your plants will flourish.
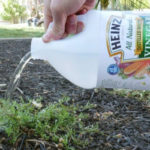
4 Liquid Soap

Often one of the biggest problems in a garden is weeds. They grow in time to tell, and it’s often a huge task to pull them out. Prevention is better than cure, they say!
A simple and effective way to get rid of weeds is to prepare a mixture of 5 tablespoons of dish soap and 4 cups of water that you will spray on problematic areas. This will get rid of the weeds, rest assured!
5 Kill The Slugs
Weeds aren’t the only things that might torment your garden. Hungry slugs can also slither through your greenery, ruining your plants for good. With a little beer, however, you can take care of your slug problem for good.
Simply put a dish of beer into your garden, near the area where you most often see slugs. The slugs will be drawn to the beer and the liquid will kill them, leaving your garden slug-free.
6 Double Your Pots
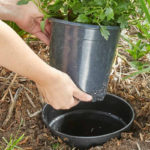
When you start planting your garden, it’s incredibly difficult to imagine the finished product. While taking care of your plants is your first priority, you also want your garden to have an aesthetic appeal. It’s incredibly disappointing when your plants mature and ruin the image you had in your mind of your lovely garden.
To fix this problem, you can plan ahead before you even start planting. When placing your plants, bury them at ground level in two pots. As your plants grow, you can easily lift out the top pot and rearrange your garden. You can change out seasonal plants and mix up colors and placements at will, all the while keeping your precious greenery alive.
7 Citrus Peel
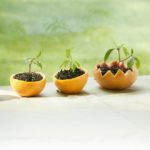
You have new seeds to plant, but no pots? If you enjoy eating citrus, you’ll probably want to keep their peel from now on, because they can be very useful!
Indeed, they are the perfect size for new seedlings, and when the time comes to plant them, you can plant the peel with them. Even simpler, isn’t it?
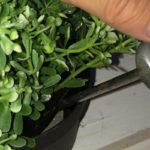
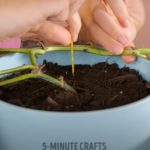
8 Start Rose Cuttings In A Potato
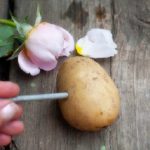
Potatoes can also help you have a very beautiful garden. In fact, they can help you grow a variety of plants or flowers very easily! First, you’ll need to drill a hole in your potato. To do this, you can use a nail of considerable size.
Next, cut one inch off the stem of the plant you want to grow, then place it in the hole before you plant your potato. Whether you want some rose bushes, but find them too expensive, or you’re dreaming about various herbs instead, this tip is very effective and will save you a lot of money!
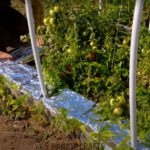
9 Fight Blight With Pennies
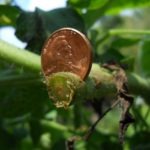
Unfortunately, in a garden, your various plants can become infected with blight, a series of cryptogamic diseases. Obviously, this is not very good for your crop, but it could be quite simple to counteract this problem.
If you encounter this problem in your garden, take some money out of your pockets. First, prune and tie up your tomatoes. Next, make a cut in the stem, then insert your penny so that it goes in tightly to make sure it doesn’t fall out. The copper in the penny will help your plant since it can control many types of mould, algae, fungi and microbes.
10 Put Your Muffin Tin To Work
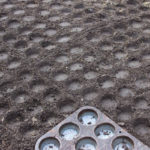
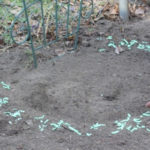
When planting your garden, the spacing of your plants is important. You want to give your shrubs enough room to grow, but you also want to ensure even spacing to create a pleasing aesthetic when your seeds sprout. If you’re looking to get your spacing completely perfect, pull out your muffin tin!
In the cleared area where you want to plant, push your muffin tin into the ground. Move it to the next space and push it in again, and so on and so forth until your entire planting area is covered in little muffin-sized pits. Then place your seeds in each of those pits and watch them sprout into beautiful plants.
11 Make Your Own Raised Garden Bed
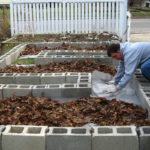
A raised garden bed adds something to your space and allows you to separate your plants from the rest of your yard. Unfortunately, if you don’t have one already built, putting a raised garden bed together can be a pain. If you’re looking for a quick and easy way to create your own raised garden, purchase a few cinderblocks.
Arrange the cinder blocks in a rectangle and fill the middle of each one, and the large area in the center of all the cinder blocks, with fresh soil. You can plant all your shrubs in this small space, creating a confined area that’s easy to work with for your garden.
12 Create Pot Markers
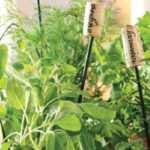
Once your seeds go into the ground, it can be difficult to keep all your plants straight. If you want to ensure that you know exactly what’s growing, especially if you’re growing edible things like vegetables, you’ll need pot markers.
Create your own labels by saving old wine corkers and spearing them with kebab skewers. Write the name of each plant onto the wine cork and stick the skewer into the ground near the corresponding plant. It adds a little whimsy to your garden. Not to mention, the wine corks are a cheap and effective way to make your own pot markers.
13 Make Your Own Spray Collar
Weed spray is the easiest way to rid yourself of those unwanted plants that pop up around your garden, but the spray comes with its own challenges. Each time you spray, you run the risk that you’ll get some weed killer on the plants that you do want, destroying the rest of your garden along with the weeds.
Thankfully, a spray collar solves that problem. Find an old can or small plastic bucket in your home and cut off the bottom and top to create one long cylinder. Then, place that cylinder over the weed you want to kill before spraying your weed killer directly into the collar. It limits the over-spray, and ensures that your weed killer is attacking only the plant you don’t want, sparing the rest of your garden from its deadly wrath.
14 Put Fly Tape On Your Gardening Hat
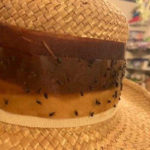
When we garden, and therefore spend a considerable amount of time outdoors, it’s inevitable that a ton of mosquitoes and insects will cross our path, and many will bother us. You know, those famous black flies that are absolutely unbearable and fly around your head? Fortunately, thanks to our ingenious tip, all that is over!
Before you put on your gardening hat next time, take some fly tape and wrap it around the brim of your hat. Once you’re outside, any unwanted pests that try to bother you will get the surprise of their lives when they can’t get out of your hat! This way you can garden in peace without always having to chase mosquitoes away from your face!
15 Repurpose Toilet Paper Rolls
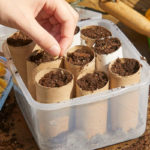
After you’re done with a roll of toilet paper, you’re left with a cardboard tube that doesn’t have any other use. Now, you can use that tube for your garden. When starting your seeds, take a waterproof container, and fill it with empty toilet paper tubes. Fill each tube with potting soil and plant your seeds right inside the cardboard.
When the time comes to move them to the garden, you can plant the cardboard tube right into the ground. The cardboard will decompose over time, but it will keep your seeds safe while they struggle to germinate.
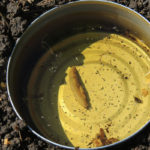
16 Convert Your Coffee Filters
When planting shrubs in potted plants, you want to allow water to ooze out of the bottom of the pot, but you don’t want the dirt to flow out with it. If you close off the bottom completely, you run the risk of water-logging your plants. If you don’t, you might lose some of the tightly packed dirt that keeps your plants healthy.
A simple coffee filter can solve your problem. Place the coffee filter at the bottom of your pot before filling it with soil. The coffee filter will allow the water to flow through, but it will keep the dirt trapped inside where it’s meant to be.
17 Scatter Soap
Sometimes hungry rabbits or deer unfortunately assume that your garden is their personal feeding ground. They’ll mulch away at your greenery, ruining all your hard work in one meal. Thankfully, soap provides a solution to this problem. Shred some soap in your food processor and scatter it among your plants. Don’t cover the entire ground, but leave a healthy supply of shavings interspersed with your mulch.
The smell of the soap will keep hungry animals away, but the soap itself won’t damage your plants. You’ll have to replenish your shreddings if they wash away, but other than that it takes very little effort for you to keep your plants safe.
18 Banana Peels
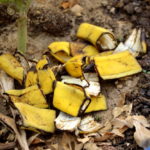
Many fertilizers sold in stores may contain questionable products, and we’ll tell you, sometimes it’s just very expensive to buy. Fortunately, you probably have natural fertilizers on hand without even knowing it! If you’re used to eating bananas, it’s time to stop getting rid of their peels. Instead, save them to make your own homemade fertilizer for your garden. It’s extremely simple, and very effective!
Banana peels contain potassium, calcium and magnesium, which are very good for your garden. Cut your banana peels into pieces and mix them with water. Let it sit for 24 hours and then place the mixture in your garden!
19 Fertilize Your Garden With Kelp Tea
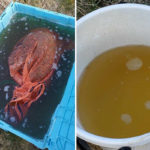
Kelp is a derivative of sea plants and contains a significant amount of micronutrients and vitamins that have many benefits for your garden. If, for example, you want to grow organic garlic, kelp tea will help you greatly. To prepare the kelp tea solution, nothing could be simpler: add 1/2 cup of kelp meal to 1-5 gallons of water, depending on how strong you want your tea to be. Let it sit for 1-3 days, remembering to stir it daily. After that, use it wherever you need it!
For example, before planting your seeds, let them soak in the tea for a few hours before planting them. You can also use it as a foliar spray to protect your plants from cold or hot weather. You can also apply the tea to the soil when you transplant your plants to reduce shock, and then consider watering your plants with kelp tea once a month to stimulate soil microbial activity!
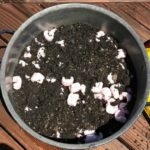
20 Grow Tomato Plants From Sliced Tomato
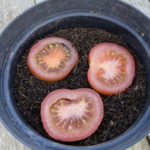
Growing tomatoes is very common. It is indeed a very popular and versatile food. Moreover, tomatoes are very easy to grow, and you don’t even have to go out and buy a plant from which to start your harvest!
Take a tomato and cut it into thin slices. Place the slices on potting soil that you have previously placed in a pot. Cover the slices with more potting soil and water. It will only take a week or two before you have seedlings to transplant into your garden!
21 Save Your Plastic Containers
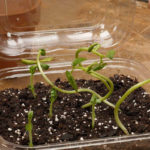
If you don’t have any soda bottles handy to create your own mini greenhouse, you can also use plastic to-go containers from restaurants. Plastic clamshell containers are the perfect place to get your seeds started.
Wash your container thoroughly after you finish your food and fill the bottom with soil. Then place your seeds inside with enough space between them for each seed to grow. Close the container and set it near the window where it can soak in the sun. The plastic container keeps moisture locked inside while still allowing sun and warmth to reach your plant. Your seeds will sprout in no time!
22 Weed When Wet
Have you ever tried lifting weeds from the tough, dry ground? It’s not easy, is it? Dry ground is unforgiving and inflexible, so trying to tug weeds out from their roots is a difficult (sometimes impossible) task. It’s better to weed when the ground is wet.
Head out to your garden after a rainy day or create your own wet soil by drenching your garden with the hose. You’ll find that pulling weeds out of wet ground is much easier than tugging away at the dry ground. While the task may be a little messier, the disappearance of the weeds will be worth the extra mud.
23 Brew Fertilizer Tea
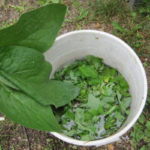
Weeds are annoying in more ways than one. While they interfere with the growth of your plants, they also soak up nutrients from your soil that your plants need to survive. When you pull weeds and throw them away, you’re essentially tossing out all those nutrients as well. But you don’t have to.
Instead, throw your weeds into a bucket of water after you pull them. Cover the bucket and allow the weeds to steep, just like a bag of tea. After a few hours, you can pour that water back onto your plants and throw the wet weeds away. The process returns a few of the nutrients you’re missing back to your soil.
24 Change Your Tools
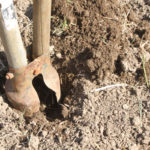
When planting a vegetable garden, you probably spend a lot of time on your hands and knees, digging the holes you need to plant your vegetables. After a while, hunching over the ground and engaging in so much physical labor takes a toll on your body.
To make the process easier, use a posthole digger to quickly create a few holes deep enough for your plants. This method will be much quicker than digging each individual hole. Plus, your back and hands will thank you for taking some of the pressure off of them during your gardening.
25 Plant Your Soda Cans

If you have a deep planter, fill the bottom with old soda cans before placing your shrub. The cans create little air pockets that will aerate the soil, leading to healthier ground for your greenery.
With healthier soil, your plants will flourish, even in deep planters where you don’t have as much control over what’s happening underneath the surface. Who knew old soda cans could save your garden?
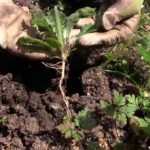
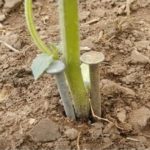
26 Careful Plant Removal
Although your plant often grows in one designated pot, it certainly doesn’t have to stay in that pot forever. Sometimes you’ll bring home store-bought shrubs that you want to replant, or you may want to move your own plants out of their designated container. If you pull the plants up and out, however, you risk tearing the roots and damaging your shrub.
To avoid that problem, take a sharp knife and cut down the sides of the pot. Once you have enough room, you can wriggle the plant out of the container, keeping most of the surrounding soil intact. Using this method, your plant is ready to be replanted, and the roots are thankfully preserved.
27 Make Edging Easier
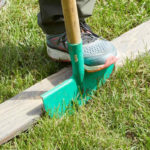
While edging your garden, your biggest challenge is creating a straight line to surround your space. Thankfully, the solution to your problem is so incredibly simple.
Lay down a 2×6 board where you want the end of your garden to be. Make sure the board is laying straight and place your foot on top of it so it doesn’t move. Then, take a spade and shove it into the ground right at the edge of the board. Move your spade down the line until you reach the end of the board. Continue this process all around your garden, moving the board as needed. Once you’re done, you’ll have a clean, straight line that separates your garden from the rest of your yard.
28 Use Your Old Sponges

Too much water can be just as damaging as too little water for the plants in your garden. If water settles at the bottom of your pot, it can rot your roots, causing your precious plants to die.
To maintain a healthy balance of water for your plants, put old sponges at the bottom of your pot. The sponges will soak up the excess liquid that could damage your plants, while simultaneously maintaining enough moisture to keep your plants healthy.
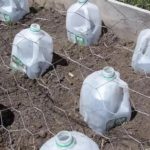
29 Create A Tiny Greenhouse
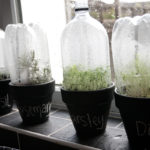
If you’re having trouble starting your seeds or cuttings in your garden, a tiny, at-home greenhouse might provide a solution. Take an empty 2-liter bottle of soda and remove all labels so you’re left with clear plastic. Then remove the bottom of the soda bottle and place it over the soil that houses your seeds or cuttings.
The result is a tiny greenhouse that allows your seeds to grow, protected from environmental factors that might interfere with their germination. Once your seeds have germinated or your cuttings have rooted, you can remove the soda bottle and allow your plants to grow on their own.
30 Fertilize With A PVC Pipe
If your garden houses dense plants, fertilizing your greenery is a challenge. Your fertilizer has to reach the base of the plant, but it’s difficult to reach the base of close-packed shrubs. That’s when a PVC pipe comes in handy.
Cut a 45-degree angle at the top of the PVC pipe to create a larger opening. Then, place the other end of the pipe at the base of the plant you want to fertilize. Pour the fertilizer down the PVC pipe, ensuring that it lands right where it’s supposed to. The result is healthier plants with less effort on your part.
31 Use Cardboard
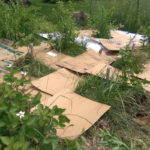
After you have your garden planted, you’re ready to lay down your mulch. Before you do that, however, you can add an easy protective measure that will help to keep your garden free of weeds. Before putting down your mulch, lay pieces of cardboard on the ground around your plants. Then lay the mulch on top of the cardboard.
The cardboard will block weeds from growing, eliminating the need to fill your garden with harsh chemicals and keeping your plants safe.
32 Make A Watering Hole
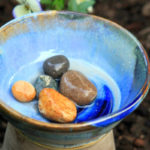
While some insects and animals are obviously unwanted in your garden, others are a welcome sight. Bees in particular don’t pose a threat to your plants, and their pollination techniques are crucial for the environment. Invite these little workers into your garden with a DIY watering hole.
Take a small dish and fill it with a tiny bit of water. Put rocks at the bottom of the dish to give visiting bugs somewhere to stand. Place it near your garden so the bees that visit your plants can take a fresh drink without drowning. The simple addition of water won’t cause bees to flood to your bushes, but it will be a nice treat for any insects who decide to fly by.
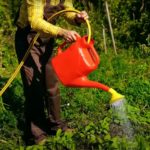
33 Produce A Watering Can
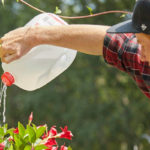
A watering can is one crucial tool for your garden, but it doesn’t have to be expensive. Instead of purchasing a store-bought can, make your own with an empty gallon jug. Once you’re finished with the jug, fully rinse out the previous liquid. Take the cap of the jug and poke a series of tiny holes in the top.
Once that’s done, fill the jug with water and screw the cap back onto the top. After that, all you have to do is head out to your garden and tip the jug out over your plants. Water will pour out, drenching your shrubs in the much-needed liquid. It’s the perfect watering can if you’re gardening on a budget.
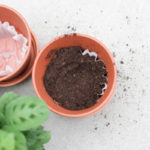
34 Improve Your Garden Soil
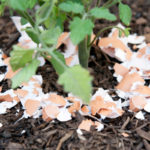
A thriving garden starts with thriving soil. When your soil is full of nutrients, your plants will grow bigger, stronger, and healthier. If you want to boost your soil, you don’t have to buy expensive products. In fact, you can use kitchen leftovers bound for the trash heap.
Banana peels, coffee grounds, and egg shells can all boost the nutrients in your soil. Simply plant these throwaway items in your garden and watch your greenery grow. You’d be throwing them out anyway—you might as well use your garbage for something meaningful.
35 Fill Your Soil With Plastic Forks
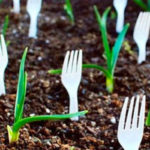
Even animals that have no interest in eating your plants can tromp through your garden and ruin all your hard work. If you want to keep every critter out of your space, plastic forks might be your saving grace. With the pointy end up, stick forks intermittently throughout your soil.
By leaving little room for animals to walk, you’ll effectively keep them out of your garden. Plus, the forks won’t cause any damage to your plants.
36 Make Your Own Insect Spray
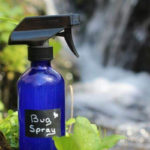
While a weed spray will kill off the unwanted plants in your garden, an insect spray will keep away the beasts that want to feed on your plants. From snails to mosquitos, insects will be drawn to your garden. They’ll chew away at your leaves and might even bite you if you’re unlucky enough to run into them.
To take care of any insect problem, simply combine a healthy amount of garlic and mint, and put the mixture into a spray bottle. This cost-effective, organic spray will keep the insects away without harming any of your plants.
37 Get A Shoe Organizer
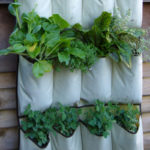
If you want to save a little space in your garden, you can create a vertical planting ground with an over-the-door shoe organizer. When you get the shoe organizer, stick a few holes in the bottom of each compartment to allow water to drain. Then fill each compartment with soil. After that’s done, you can put a different plant in each section.
This method is especially useful for creating an at-home herb garden. Loop the organizer over an outside door and there you have it—your own vertical herb garden that fits beautifully in any space.
38 Reuse Your Cooking Water

If you’re like everyone else, once you’ve cooked your vegetables, pasta or any other food in water, you throw that water away without even thinking about whether you could reuse it instead of getting rid of it.
However, the plants in your home or garden need water regularly, and be assured that they are not fussy about where the water is coming from! So instead of throwing away your cooking water and using good drinking water to water your plants, let your cooking water cool down and use it to water them!
39 Take Care Of Your Tools
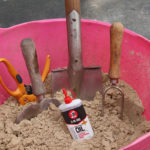
To take care of your garden, you have to take care of your tools. If you want to ensure that your tools are always ready and clean, all you need is a bit of mineral oil and a bucket of clean sand. The sand in the bucket allows you to stick your tools right in where they’ll stand upright, ready for the next use. When you’re ready to garden, you simply have to grab the handle and pull your tool out.
Once you’re finished with the tool, spray it with a bit of mineral oil and put it back in the sand. The combination of sand and mineral oil will keep your tools clean and sharp. Most importantly, it requires almost no effort from you.
40 DIY Weed Killer
Keeping the weeds at bay is an essential part of caring for your garden. If you’re looking for a quick and easy way to get rid of those unwanted plants, you’re probably turning to weed killer.
While store-bought weed killer is effective, it’s also filled with harsh chemicals that may damage your garden, rather than help it. Plus, the cost of weed killer can add up over time. To eliminate those problems, make your own weed killer at home using natural ingredients. Simply mix up a little dish soap, vinegar and salt, pop it into a spray bottle, and watch those weeds disappear.
41 Keep Your Garden Healthy
If you have cornstach in your kitchen cabinet, you should consider using it in your garden. Indeed, its uses in your garden are even more varied than in your kitchen!
You can sprinkle a little cornstach on the leaves of your plants to keep the worms away, but you can also dip the seeds of your future corn, tomato or bean plants so that the seeds sprout more quickly. Cornstach will also improve the sandy coastal soil, reduce the need to water your plants, control Nitrogen pollution and repel ants.
42 Eliminate Weed
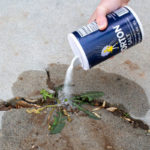
If you have weeds growing in between the bricks of your terrace, salt can be quite practical in eliminating them.
To benefit from this ingredient, all you need to do is sprinkle some between the bricks and make sure the salt goes into the soil by pressing it in with your hands so the weeds can’t grow. They should disappear quite rapidly.
43 Add Packing Peanuts To Your Soil
If you’re planning a container garden, consider mixing packing peanuts into the soil. This method allows you to use less garden soil, which can make larger containers lighter and easier to move.
Simply mix a generous amount of packing peanuts into the soil before planting. This technique can be particularly helpful if you plan on moving your container garden around.
44 Add A Diaper To Your Potted Plants

Did you know that placing a diaper at the bottom of your potted plant can help it grow healthier and faster? Diapers are great at absorbing excess moisture and preventing over-watering, which can lead to root rot and other problems. This gardening hack can also be used in hanging baskets, where the diaper can provide constant moisture, even in windy conditions.
Simply cut off the tabs of a disposable diaper and adjust it so that the absorbent side faces up. Then, fill your pot or basket with soil and enjoy your fresh-smelling, healthy plants!
45 Plant Whole Bananas In Your Garden
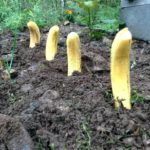
Planting whole bananas in a garden is a way to add nutrients to the soil. As the banana decomposes, it releases potassium, phosphorus, and other nutrients into the soil, which can benefit nearby plants. Additionally, the decomposing banana peel can help retain moisture in the soil and deter pests.
Some gardeners also believe that burying the entire banana helps to feed and nourish the soil’s microorganisms, which can further improve soil health.
46 Help Your Azaleas To Grow With Soda
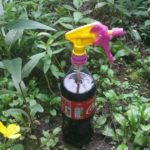
Did you know that pouring cola into your soil can help your plants grow more efficiently? Gardeners have found that adding four ounces of cola to the soil can give azaleas or gardenias a boost. This trick works with any kind of cola, even the cheaper brands.
The reason cola works as a fertilizer is that it contains phosphoric acid, which can provide a quick source of energy for plants. While it may seem like a strange hack, many gardeners have found that using cola can help their plants grow stronger and healthier.
47 Automatic Watering System For Your Plants
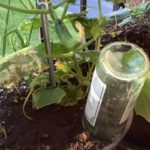
If you have old glass bottles lying around, don’t throw them away just yet! You can actually use them to help keep your plants hydrated during hot summer days. All you need to do is fill up a glass bottle with water, quickly turn it upside down, and bury it in the soil near the roots of a thirsty plant.
The water will slowly seep out of the bottle, providing a constant source of hydration for the plant. This trick works with beer or glass pop bottles too. Not only is this a great way to reuse glass bottles, but it can also save you time and effort from having to water your plants manually.
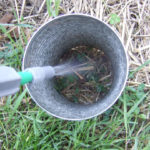
48 Water Your Potted Plants Using Ice Cubes
If you’re a new gardener, you might be worried about over or under watering your delicate plants, such as succulents. But did you know that using ice cubes can be an easy hack to keep your plants hydrated? Simply place a few ice cubes on the soil once a week and let them slowly melt, providing a slow and steady source of water to the plant roots without risking waterlogging the soil.
Just make sure to avoid placing the ice cubes directly on the plant roots or stem. Alternatively, you can put several ice cubes in a plastic box with a hole at the bottom, letting the water drip down slowly into the soil.
49 Give Your Plants A Bit Of Iron
Iron is an essential nutrient for plant growth, and rusty nails can help provide it. By inserting several rusty nails in a pot around a plant, the iron oxide present in the nails will leach into the soil, providing the plant with much-needed iron.
In addition, rusty nails can help increase soil acidity slightly, which can be especially beneficial for plants that prefer neutral or acidic soil. It’s a simple and cost-effective way to give your plants a little extra boost!
50 Make Your Own Garden Plow
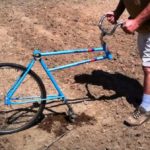
Using an old bicycle in a garden is a creative way to repurpose the bike and turn it into a garden plow. The back wheel of the bike is removed and replaced with a metal frame, and the bike is then attached to a plow blade.
This allows the bike to be used to till and turn over the soil in the garden, making it easier to plant and grow crops. The bike can also be used to create furrows or rows for planting, and it is a more eco-friendly alternative to using gas-powered tillers.
51 Deter Birds From Eating Your Plants
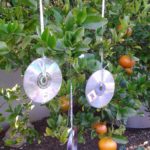
Hanging old CDs in a garden can help to deter birds and other animals from eating or damaging plants. The reflective surface of the CDs can create a flashing effect when they catch the sunlight, which can startle and scare off birds and other animals.
This technique can be especially helpful in areas where birds or other animals are a persistent problem for gardeners, which is not a rare occurence.
52 Create Slings Using Pantyhose
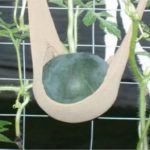
Gardeners use pantyhose in their gardens for several reasons. One of the most common uses of pantyhose is to create slings for plants. If a plant is heavy and the stem or branch is weak, gardeners can create a sling with pantyhose to support the plant and prevent it from breaking.
Another use of pantyhose in the garden is to tie plants to stakes or trellises, providing additional support for the plant to grow vertically. Pantyhose are also useful for storing onions, garlic, or other vegetables that need to be kept dry and well-ventilated. By placing the vegetables in the legs of the pantyhose, gardeners can hang them in a dry, cool place, preserving them for longer.
53 Reuse Your Empty Milk Jar
Empty milk jugs can be used in a variety of ways to benefit a garden. One popular use is to create a mini greenhouse by cutting off the bottom of the jug and using it as a protective cover for seedlings or small plants. The jug will help keep the plants warm and protected from the elements, giving them a better chance to grow and thrive.
Milk jugs can also be used as planters by cutting a hole in the side and filling it with soil and seeds. They can even be used to create a DIY watering can by poking holes in the cap and filling the jug with water.
54 Add Wood Ashes To Your Soil
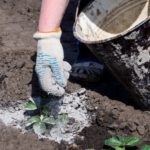
People use wood ashes in gardens as a natural fertilizer because they contain potassium, calcium, and magnesium, which are essential nutrients for plants. Additionally, wood ashes can help increase the pH level of acidic soil, making it more alkaline and suitable for plants that prefer a less acidic environment.
However, it is important to use wood ashes in moderation and avoid using them around acid-loving plants such as blueberries or rhododendrons, as it can harm their growth.
55 Keep Pests At Bay With Hair

People put hair in the garden to keep pests at bay. The scent of human hair can repel many garden pests such as deer, rabbits, and rodents. Gardeners can sprinkle hair clippings around plants or hang nylon stockings filled with hair in the garden to deter pests.
The theory behind this tip is that the scent of human hair makes animals think that humans are present in the area, which causes them to avoid the area out of fear. Additionally, hair can also help to fertilize the soil as it decomposes, providing plants with important nutrients such as nitrogen. This trick would also works using dog hair.
56 Help Pollinate Your Tomato Plants
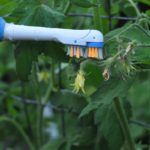
Using an old electric toothbrush in a garden can help to pollinate tomato and peppers plants. When the electric toothbrush is vibrated against the plant flowers, it helps to shake the pollen loose and distribute it throughout the plant.
This technique can be especially helpful in areas where there is a lack of pollinators such as bees or if the tomato or pepper plants are grown indoors where natural pollinators cannot reach them.
57 Make Your Own Seed Tape
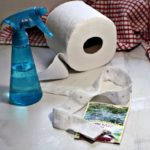
Making your own seed tape using toilet paper is a gardening hack that can save you time and money, and make planting easier. Instead of individually planting seeds, you can create a tape with the seeds already spaced out. This ensures proper spacing and prevents overcrowding.
Toilet paper is an ideal material for this because it is biodegradable and easy to tear. You only have to use water as a natural adhesive to stick both halves of the toilet paper together. Once the seed tape is made, you can simply lay it on the soil and cover with a thin layer of dirt. The toilet paper will decompose, and the seeds will germinate, resulting in a beautiful garden.
58 Water Your Big Garden Easily
Gardening can be a relaxing activity, but constantly going back and forth between the garden and the water source can be a hassle, especially if you have a big garden. One easy solution is to fill a large water can and stick your hose in it while you work.
This way, you’ll never run out of water while you’re tending to your plants. It’s a simple trick that can save you time and energy, leaving you with more time to enjoy your garden.
59 Create Your Own Fastest Seed Spacer
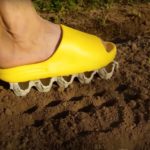
If you struggle with planting seeds too close together, a simple trick is to wear a rubber sandal with an egg carton glued underneath. The carton will serve as a seed spacer, allowing for proper plant spacing and avoiding overcrowding.
Once you glued the egg carton underneath your sandal, simply walk along the garden bed, pressing the carton cups into the soil as you go, and drop a seed into each cup. This trick is a fast and easy way to ensure that your plants have enough space to grow and thrive.
60 Optimize Your Composting
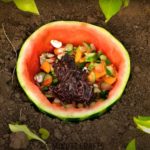
This garden trick is known as “watermelon seed composting,” and it has a couple of benefits. First, the watermelon rind is biodegradable and acts as a natural container for the compost. The rind also attracts earthworms and other beneficial organisms that help break down the organic matter and enrich the soil.
Additionally, as the watermelon rind decomposes, it releases nutrients into the soil, which can benefit the growth of plants. Finally, this method is a great way to recycle and reuse food scraps in your garden. All you need to do is place your melon in the ground, plant it, then water it!
61 Dig Your Ranks Easily
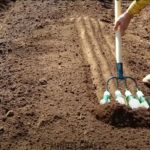
Digging garden rows can be a strenuous task, but it can be made easier with this garden trick. Using a pitchfork with glass bottles on each tip can help you dig more effectively. The glass bottles will break up the soil, making it easier to dig and aerate.
As you dig, the bottles will also help to remove rocks and other debris from the soil, making it easier to plant your seeds. This method can be particularly helpful for those with large gardens or for those who find traditional digging methods to be too difficult.
62 Use Aluminum Foil To Repel Snails
One garden trick to repel snails is to apply aluminum foil around your garden beds. The reflective surface of the foil can disorient and deter snails from entering the garden. Simply wrap the foil around the edges of the garden bed. If you don’t have a low wall around your garden, just make sure to press it down into the soil to secure it in place.
It is recommended to replace the foil every few weeks to ensure its effectiveness. This is an easy and affordable way to keep snails away from your garden without using harmful chemicals.
63 Help Your Grass Grow Faster
A mixture of water, toilet paper, and grass seeds can be applied to a patch of grass to help promote grass growth. The toilet paper acts as a mulch, helping to retain moisture and protect the seeds from being eaten by birds or washed away by rain.
The grass seeds will germinate and grow through the toilet paper, resulting in a healthier, thicker lawn. This technique can be especially useful in areas where the soil is thin or where there are bare patches in the lawn.
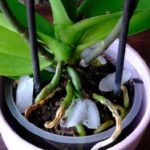
64 Make It Look Like A Full Plant
People might use bobby pins to fix their plant stem in the soil if the plant is weak or leaning to one side. By carefully placing the bobby pins around the stem and gently pushing them into the soil, the stem can be held in place and will continue to grow straight up.
This trick is especially useful for plants that have multiple stems or branches that need to be held together for a fuller appearance. Additionally, the bobby pins are small and discreet, making them a good alternative to more visible plant supports like stakes or trellises.
65 Blend Some Bugs For A DIY Insecticide

To make your own natural insecticide, gather insects from your garden and blend them with one part water to two parts bugs in a dedicated blender. After straining the mixture, pour the liquid into a spray bottle.
This DIY insecticide is highly effective and can help keep pests away from your plants. It’s important to note that you should use a separate blender for this purpose, rather than one that you use in the kitchenm because, you know, it can be a bit gross.